- by Mamazing Team
How to Clean a Stroller the Right Way
- by Mamazing Team
Something is in there. Could be the grape from two Thursdays ago. Could be the milk that pooled under the seat when you hit a bump. Could be nothing — until August, when the heat finds it.
Stroller cleaning is genuinely not hard. The issue is that most guides either skip the parts that matter (the harness straps, the wheel axles, the underside of the frame chassis that nobody ever touches) or tell you to use products you should not bring near a child.
The AAP guidance on keeping baby gear safe is direct on this: surfaces your child contacts regularly need non-toxic cleaners that don't leave chemical residue. That standard applies to everything in this guide — and it works across any modern baby gear built to last and stay clean, whether it is aluminum frame, carbon fiber, or fabric-heavy builds.

Ask ten parents this and you will get ten different answers. The honest answer: it depends on whether you are parenting a tidy child (rare) or the usual kind.
|
Frequency |
What to do |
When |
|
Every other outing |
Wipe handles, seat edges, cup tray |
Snack mess, visible crumbs, sticky armrests |
|
Every 2–4 weeks |
Vacuum + spot-clean fabric + wipe frame |
Regular daily or weekly use |
|
Once a season |
Full clean — straps, wheels, basket, fabric |
Beach trips, pre/post storage, heavy staining |
|
Same day |
Bodily fluids only — no exceptions |
Vomit / urine / milk — the smell becomes permanent overnight |
The schedule for most people is roughly: wipe when obviously dirty, deep-clean quarterly. Fine. But bodily fluids are not on a schedule. Milk proteins bond to fabric fibres when they dry. Vomit smell compounds. You cannot undo that with a seasonal clean six weeks later. Same day, or the smell lives there.

If you find yourself cleaning every week because the seat soaks everything through and never looks right — that is a stroller problem, not a cleaning problem. A lightweight carbon fiber stroller with washable seat with a properly removable, machine-washable seat cover makes the seasonal deep clean a 30-minute job, not two hours.

You do not need a baby gear cleaning kit. Everything that works is probably in your kitchen right now.

|
Supply |
Notes |
Baby-Safe? |
|
Dish soap + warm water |
Gets most fabric stains. Rinses clean, no residue. Start here. |
Yes |
|
White vinegar + water 50/50 |
Kills milk and food odor at the source. Smells for 20 minutes, then gone. |
Yes |
|
Baking soda |
Odor absorber. Dry on padded areas, or treat stains with vinegar. |
Yes |
|
Mild laundry detergent |
Machine-washable seat fabrics only. Cold, gentle cycle. |
Yes |
|
Handheld vacuum + crevice |
Always first. Loose crumbs become paste the moment you add water. |
Yes |
|
Microfiber cloth ×2 |
One damp for cleaning, one dry for finishing. Will not scratch frames. |
Yes |
|
Old toothbrush |
Nothing else reaches buckle housing and strap stitching. Non-negotiable. |
Yes |
|
Bleach or disinfectant spray |
Degrades harness webbing. Damages fabric. Not baby-safe. Leave it out. |
No |
|
Tumble dryer |
Shrinks seat fabric, warps hood material, destroys padding. Air dry only. |
No |
If something is not on that list and you are wondering — check the ingredients against CDC guidance on safe cleaning products around children. Two quick filters: unscented is safer than scented (fragrance residue on surfaces children touch is a real irritant issue), and anything that needs rinsing is safer than anything that claims to just air-dry clean. That second claim is often how harsh residues end up on your child's hands.
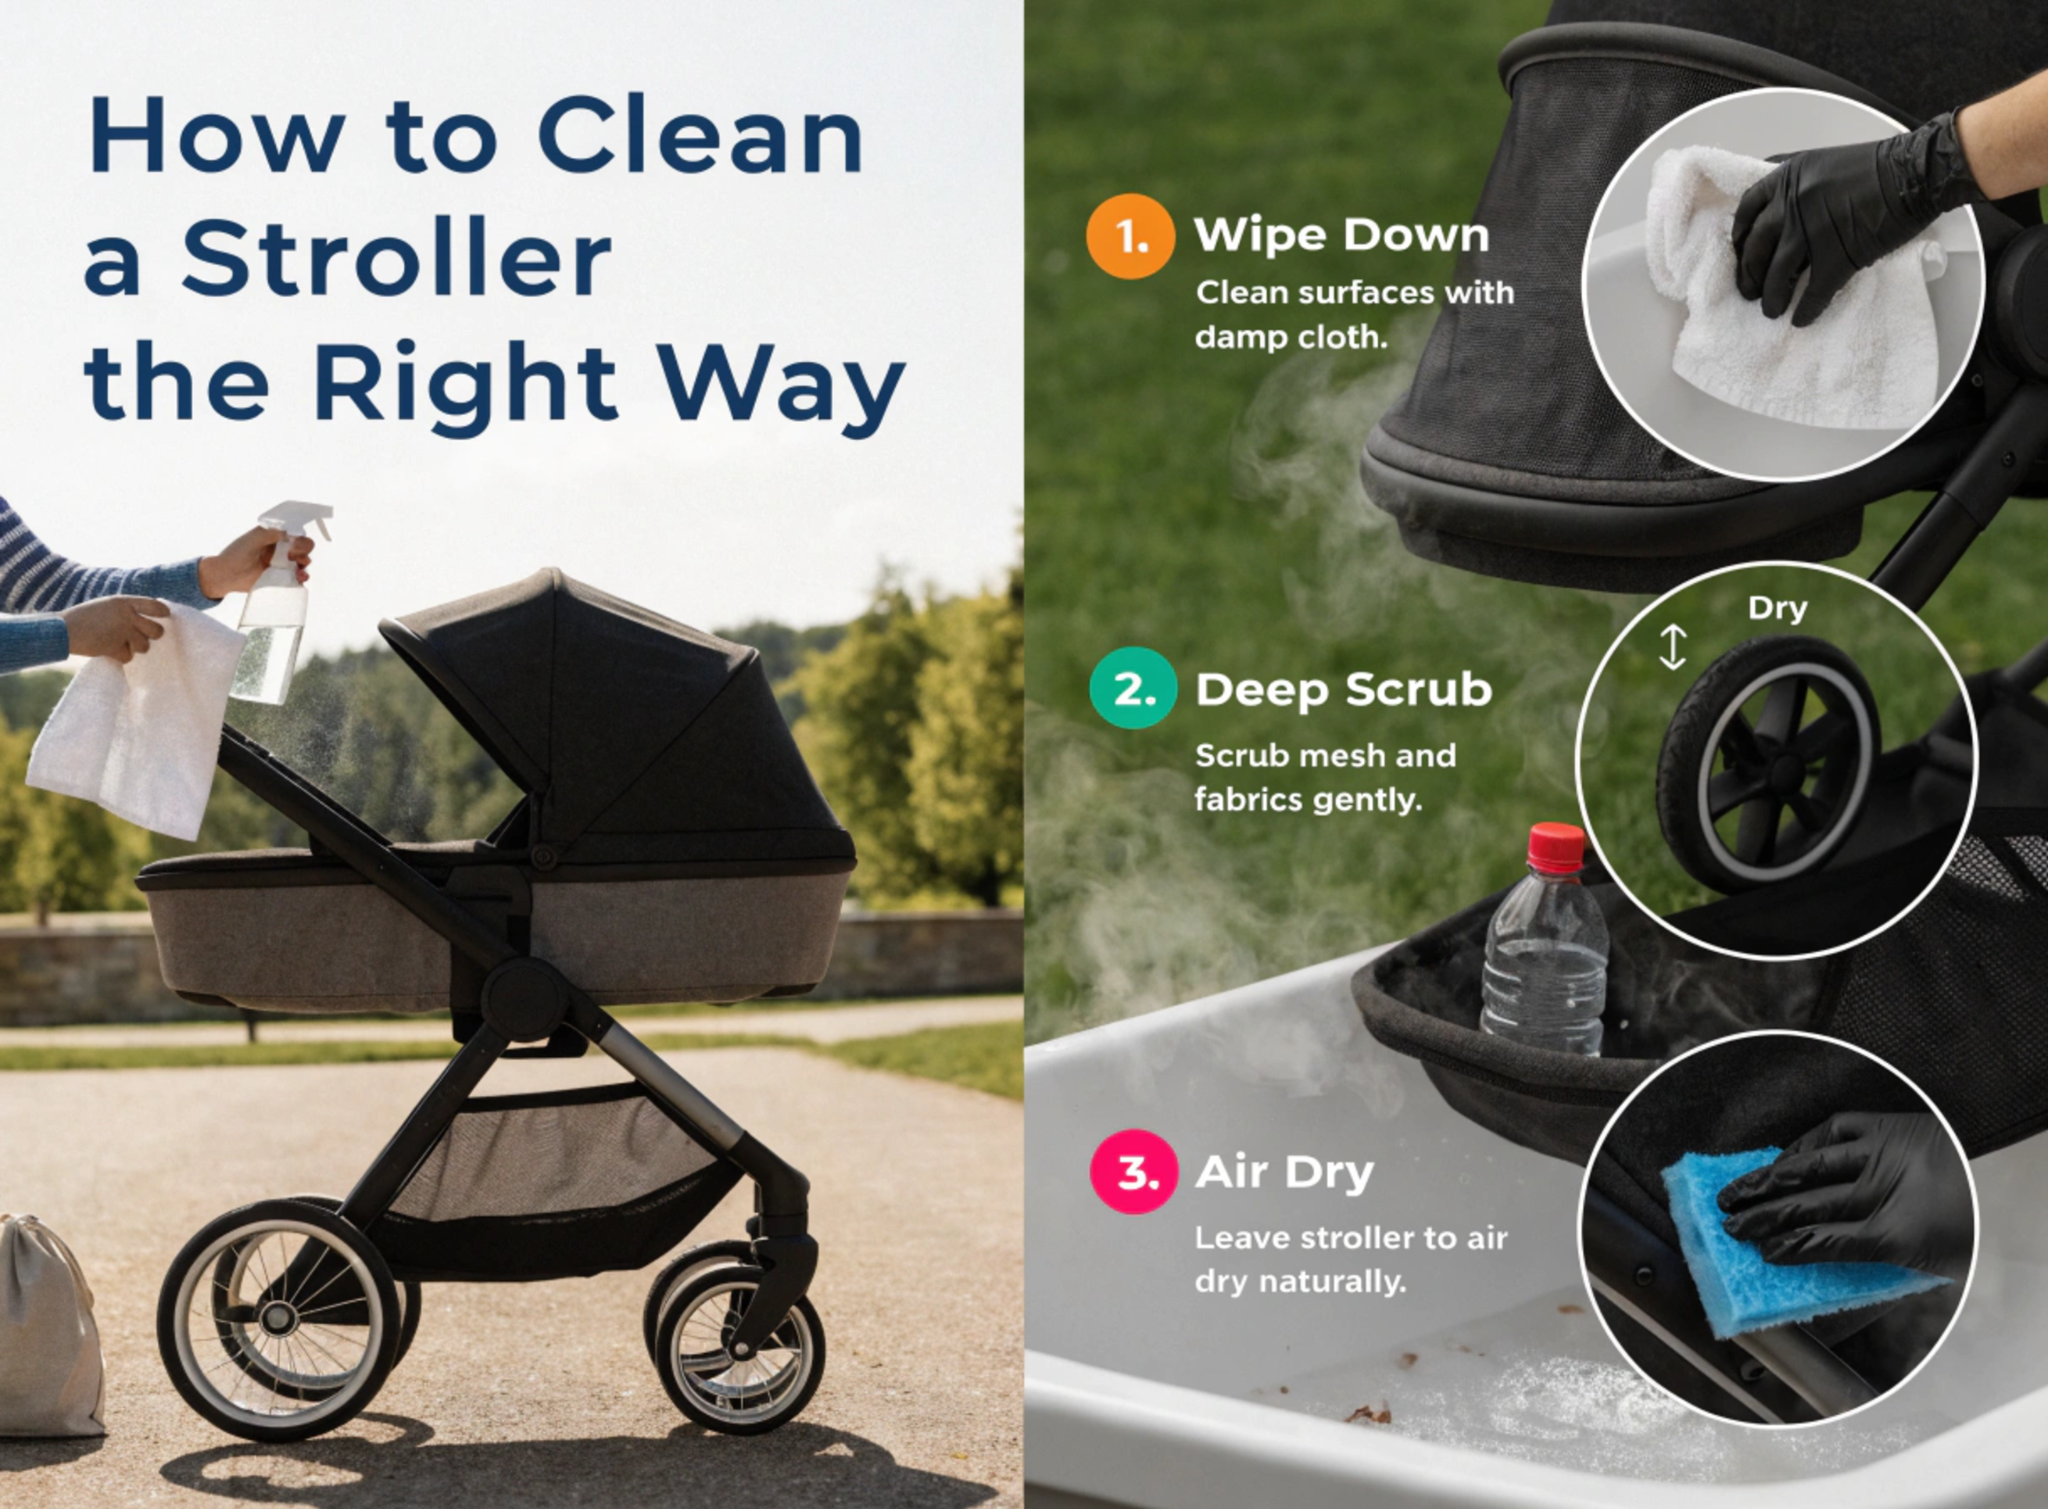
Order matters here. Wet cleaning before vacuuming turns loose crumbs into grey paste. Assembling before drying grows mildew. Follow the sequence.

|
1 |
Check the manual — seriously, check it Which parts on your specific stroller are meant to come off? This is not the same across models. Some seat covers unclip in 10 seconds. Others require removing an inner board first, then unthreading the harness, then releasing two clips you cannot see without a torch. Your owner's manual or the manufacturer's website (most have how-to videos now) will show you. Pulling at something that is not designed to detach breaks the clip mechanism, and that is an expensive mistake. |

|
2 |
Remove washable fabric and run it now If the seat cover, hood, or basket liner comes off and the label says machine-washable: take it off and start it now. Cold water, gentle cycle, small amount of mild detergent. Important technique: take it out of the machine immediately when it finishes and put it back on the stroller frame before it dries. This is not optional. Fabric dried flat off the frame warps into the wrong shape and you will spend 20 minutes fighting it back on. And yes — no dryer. Ever. |
|
3 |
Vacuum before anything gets wet Crevice attachment on a handheld vacuum. Go over the seat fabric, the harness attachment points (where the webbing threads through the seat — crumbs collect there constantly), the fold joints, and the basket underneath. The harness anchor area is where mould most commonly starts, because food debris sits in a hard-to-see pocket. Five minutes here saves significant scrubbing later. |
|
4 |
Spot-clean the fabric that cannot come off Small bowl, warm water, a squeeze of dish soap. Damp cloth — wrung out, not soaking. Work it into stained areas in tight circular scrubs. For anything that has been sitting a while: baking soda paste with a few drops of white vinegar directly on the stain, five to ten minutes, then scrub with the toothbrush. The toothbrush is doing the actual work here, not the cloth. Get it into the stitching lines and around the edges of the buckle housing — that is where discolouration hides. |
|
5 |
Handle harness straps with care — no submersion This step is wrong in almost every guide you have read. You do not soak harness straps. The webbing material is load-bearing and submersion degrades its structure over time. The ASTM F833 stroller safety standard exists because harness failure has consequences — manufacturers prohibit submersion for that reason. The actual method: a damp cloth with a tiny amount of dish soap, wiped along the full length of each strap. Toothbrush on the buckle housing and adjuster. Air dry flat. That's it. Fast, effective, and the straps stay intact. |
|
6 |
Wipe the frame — including the underside Damp microfiber cloth, dish soap. Start at the handlebars — where hands go constantly — and work down. The armrests, the side rails, the seat back frame, and then the underside of the chassis. Stop here for a second: when did you last clean the underside of your stroller? It carries more grime per square inch than the top of the seat, because it sits 10cm above the ground and catches everything the wheels throw up. It takes 90 seconds. Nobody does it. Do it. |
|
7 |
Wheels last, then air dry everything Wipe the tyre surface and the inside of each wheel housing where road grit collects. If wheels feel rough or resistant to spin, the axle joints need attention — a small amount of silicone lubricant (not WD-40, which attracts new dirt) on the axle point, then spin the wheel several times to distribute it. Then: open the stroller out completely and leave it outside in sunlight if possible. Spot-cleaned fabric dries in a few hours. Machine-washed seat covers can take a full day. Do not fold it damp. |
Sunscreen contains UV filters and oil carriers that water-based cleaners barely touch on their own. Do not reach for the dish soap and water solution first. Apply undiluted dish soap directly onto the stain, work it in with a finger, and leave it five minutes before scrubbing. The dish soap breaks the oil down before you start — without that step, you are mostly spreading it. Wipe clean with a damp cloth after. Repeat if needed.
The smell returns because you are cleaning the surface, not the cause. Milk leaves protein residue in the fabric fibres after the liquid dries — and that residue ferments. White vinegar breaks it down. 50/50 vinegar and water solution, applied generously, left 10 minutes, scrubbed with the toothbrush. Air dry in direct sunlight — the UV does work here. The vinegar smell is gone within an hour once the fabric is dry. The milk smell is gone for good.
Surface mildew responds to the same vinegar treatment. Spray, leave 15 minutes, scrub, dry in the sun. That handles most cases. But if the mildew has reached the foam layer under the fabric — and you will know because the smell stays regardless of what you do to the surface — there is no DIY fix. Professional cleaning gets deeper, or the foam insert needs replacing. That is not a failure on your part; foam that has been wet for long enough just holds mildew permanently.
Sand and salt. Always sand and salt. Rinse the wheel housing and axle joint with water first to clear the grit — do that before applying any lubricant, or you are mixing grit into oil. Dry thoroughly. Then a small amount of silicone lubricant on the axle points. Spin the wheel several times. The grinding should go. If it does not, the bearing itself may be damaged — at that point a replacement wheel is cheaper than fighting it.

If the cleaning feels like a recurring project, the stroller design might be working against you.
This single feature is the biggest practical difference in cleaning maintenance. A seat cover that unclips in 30 seconds and runs through the machine on a gentle cycle — seasonal deep cleans become a half-hour job. Most cheap strollers use fixed or spot-clean-only upholstery. Easy-care strollers designed for real family life treat machine-washable fabric as a baseline feature because they are built for actual use rather than a showroom floor.
Aluminum and carbon fiber frames have smooth, non-porous surfaces — a damp cloth moves grime cleanly in one pass without leaving residue behind. Frames with fabric-wrapped handles, textured plastic joints, or deep fold crevices have more places where food and moisture collect and fewer ways to reach them with a cloth. Not a dealbreaker, but it adds 20 minutes to every clean.
Every fold joint is a pocket where crumbs collect and moisture sits after rain. Complex fold mechanisms — the ones that feel satisfying to use — are often the ones you are cleaning with a toothbrush for 10 minutes per hinge. If you have ever cleaned the same fold joint three times in a row and still not gotten it clean, you already know this.

Most stroller cleaning is a job you can do yourself. A few situations are not.
|
Call in a professional when: |
|
Vomit or urine has soaked into foam padding — surface cleaning does not reach it and the smell will not go. | The stroller sat damp in storage and mildew has developed inside padding or at frame joints. | You have a used stroller with unknown history and you want it properly sanitised before your child uses it. |
|
Questions to ask before you book: |
|
Are your cleaning products non-toxic and baby-safe? | Have you worked with this stroller brand before? | Do you machine-wash fabric or hand-clean only? | What happens if fabric comes back shrunken or damaged? |
|
💡 Cost reality Professional stroller cleaning runs $20–$80 depending on the job. For a used stroller with an unknown history — spend the money. For a well-maintained stroller with ordinary use staining — you do not need it. |
Frequently Asked Questions
For daily or near-daily use: wipe handles and tray after obvious mess, do a proper fabric and frame clean every few weeks, and one full seasonal deep clean. But that schedule has one hard exception — bodily fluids come out the same day they happen, full stop. Vomit smell is not something you can clean out six weeks later. The proteins bond to fabric fibres as they dry and the smell becomes part of the stroller. Same day.
Only if the label or manufacturer says so — and that varies a lot between models. If it is machine-washable: cold water, gentle cycle, mild detergent. Two things matter after the wash. First: take it out of the machine immediately and put it back on the stroller frame before it dries. Fabric that air-dries off the frame warps to the wrong shape. Second: no dryer. The heat shrinks most stroller fabrics. Air dry on the frame, in sun if you can.
Dish soap, white vinegar, baking soda, mild detergent. That covers everything. Avoid bleach — it degrades harness webbing over time and is not safe near a child. Avoid anything that does not fully rinse clean. Fragrance residues on surfaces your child touches can irritate sensitive skin, so unscented is genuinely the better choice here, not just a preference.
Wipe only — this is the thing most parents get wrong. Never submerge harness straps in water. The webbing is load-bearing material and soaking degrades its integrity over time. The method: damp cloth with a small amount of dish soap, wiped along the full length of each strap. Toothbrush on the buckle housing and adjuster clips. Air dry flat. That is genuinely all it takes, and the straps stay structurally sound.
When bodily fluids have gone into the foam padding under the fabric — surface cleaning will not reach it and the smell stays permanently without deep treatment. When mildew has developed in padding or frame joints after wet storage. When you are using a second-hand stroller and want it properly sanitised. For anything else — regular dirt, food stains, general grime — you do not need professional cleaning. The DIY method handles it.


Best Stroller for Sand: What Actually Works at the Beach
When to Switch From Bassinet to Stroller Seat